Home

Wednesday, November 18, 2020

Fisher 202 Receiver Restoration

Unit: AM/FM Stereo Receiver
Manufacturer: Fisher
Model: 202
SN: 15547

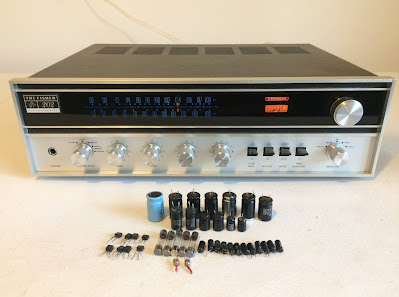
Today I am showing a little Fisher 202 receiver that came in for restoration. The Fisher 202 was introduced in 1970 and was the first of the Futura series. It produces 28 watts per channel into 8 ohms with 0.5% total harmonic distortion. The receiver has one phono input, one tape input, and two Aux inputs. The list price in 1970 was $249.95. The optional walnut veneer cabinet for this model is 21-UW.

Fisher 202_After restoration

The previous owner told me that the right channel in this receiver is dead. I checked three fuses on the back side and found that one fuse protecting the right channel is blown. I replaced the blown fuse and powered up this little receiver using my Dim Bulb Tester (DBT) to check that there are no short circuits. For more information on Dim Bulb Tester refer to my previous post on Craig 5502 restoration. The receiver passed the test with DBT and I removed the cover to look inside.

Power Amplifier Board

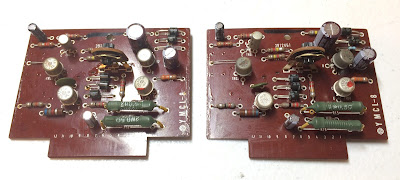
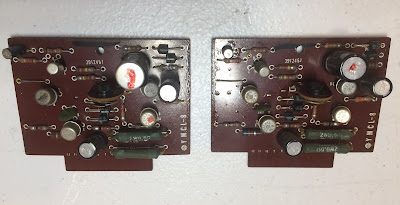
The power amplifier in Fisher 202 is very easy to service since each channel has a separate driver board inserted in the slot. I removed both boards for inspection and immediately realized that the resistor R10 on the right channel board is severely overheated. I measured its resistance and it was 267Ω. The same resistor on the left board was 183Ω. The schematic says the resistor R10 is supposed to be 180Ω. The overheated resistor from the right channel is definitely not original. I unsoldered the resistor R10 from both boards and replaced it with a new metal film resistor 180Ω/0.5W. I also tested all other electronic components (transistors, diodes, and remaining resistors) on each driver board. No other problems with electronic components were found on those boards. I replaced the electrolytic capacitor C01 with a low leakage Nichicon UKL cap. The remaining three e-caps C02, C03, and C04 were replaced with low impedance and high-reliability Nichicon UPW capacitors.

Test results on original capacitors removed from Power Amplifier board:

C01-L: rated capacitance – 1uF, measured – 1.7uF, deviation: +70%
C01-R: rated capacitance – 1uF, measured – 1.8uF, deviation: +80%
C02-L: rated capacitance – 100uF, measured – 124uF, deviation: +24%
C02-R: rated capacitance – 100uF, measured – 165uF, deviation: +65%
C03-L: rated capacitance – 220uF, measured – 261uF, deviation: +19%
C03-R: rated capacitance – 220uF, measured – 275uF, deviation: +25%
C04-L: rated capacitance – 47uF, measured – 68uF, deviation: +45%
C04-R: rated capacitance – 47uF, measured – 66uF, deviation: +40%

Left and right driver boards - before servicing

Fisher 202_Driver boards - left and right

Overheated resistor R10 on the right driver board

Fisher 202_Right driver board_Overheated resistor R10

Resistor R10 installed on left driver board

Fisher 202_Left driver board_Resistor R10

Driver boards - after servicing

Fisher 202_Driver boards_After servicing

Driver boards installed

Fisher 202_Driver boards installed

Power Transistors

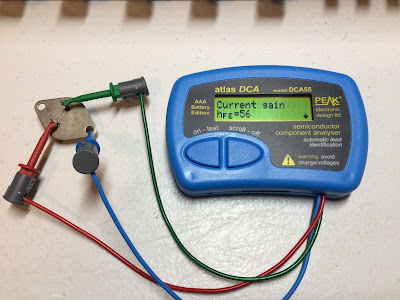
The original Hitachi power transistors 2SC1030 were removed, cleaned, and tested with Atlas DCA55 semiconductor analyzer. The DC current gain was in spec according to the datasheet. Each pair was also very well matched within ~3%. It should be noted that Atlas DCA55 semiconductor analyzer provides the accurate reading for DC current gain only on low power transistors. A high-power transistor requires a much higher collector current and collector-emitter voltage to accurately measure its current gain. However, it is still a very useful device for comparing transistors of a similar type for the purposes of gain matching or fault-finding.

I applied a fresh thermal compound and also replaced the old thermal pads with new Mica ones.

Power transistors tested with Atlas DCA55 semiconductor analyzer

Fisher 202_Original Power Transistor

Old thermal pad - the thermal grease is almost completely dried out

Fisher 202_Old thermal pad

Original power transistors with new pads and fresh thermal compound

Fisher 202_Original power transistor with new pads

Power Supply Board

The power supply board provides +15.5V DC for the tuner, +31.5V DC for the pre-amplifier and control amplifier, and +62V DC for a power amplifier. This board has 3 electrolytic capacitors C01, C02, and C03. I replaced all e-caps with low impedance and high-reliability Nichicon UPW/UPM caps. The test results on the original e-caps removed from this board are below. All of them are outside of the factory capacitance tolerance +/- 20%.

Test results on original capacitors removed from the power supply board:

C01: rated capacitance – 100uF, measured capacitance – 161uF, deviation: +61%
C02: rated capacitance – 100uF, measured capacitance – 142uF, deviation: +42%
C03: rated capacitance – 220uF, measured capacitance – 287uF, deviation: +31%

Power Supply board - before and after

Fisher 202_Power Supply_Before servicing

Fisher 202_Power Supply_After servicing

Pre-amplifier Board

The pre-amplifier board has 5 electrolytic capacitors: C1/C2, C9/C10, and C16. Two signal path capacitors C1 and C2 were replaced with low leakage Nichicon UKL caps. The remaining e-caps were replaced with low impedance and high-reliability Nichicon UPW/UPM caps. Four NPN transistors 2SC458LG installed on this board are prone to create noise or work improperly. I replaced those transistors (TR01 thru TR04) with modern low-noise Fairchild KSC1845. The new transistors were gain matched within 1%. Watch the pinout on replacement transistors if you need to service this board. The original transistor is BCE and the new one is ECB. The original electrolytic capacitors and transistors removed from the pre-amplifier board were tested to check their long-term reliability. As expected all e-caps are outside of the factory capacitance tolerance +/- 20%.

Test results on original capacitors removed from the pre-amplifier board:

C1: rated capacitance – 10uF, measured – 19uF, deviation: +90%
C2: rated capacitance – 10uF, measured – 13uF, deviation: +30%
C9: rated capacitance – 100uF, measured – 158uF, deviation: +58%
C10: rated capacitance – 100uF, measured – 160uF, deviation: +60%
C16: rated capacitance – 100uF, measured – 158uF, deviation: +58%

Pre-amplifier board - before and after

Fisher 202_Pre-amplifier_Before servicing

Fisher 202_Pre-amplifier_After servicing

Pre-amplifier board - all new Fairchild KSC1845 transistors are gain matched

Fisher 202_Pre-amplifier_New transistors gain matched

Control Amplifier Board

The control amplifier board has nine aluminum electrolytic capacitors: C503, C504, C511, C512, C513, C514, C517, C518, and C525. All capacitors except the filtering cap C525 were replaced with low-leakage Nichicon UKL caps. The e-cap C525 was replaced with a low-impedance and high-reliability Nichicon UPW cap. Four noisy 2SC458LG transistors were replaced with modern low-noise Fairchild KSC1845. The new transistors were gain matched within 1%.

Test results on original capacitors removed from the control amplifier board:

C503: rated capacitance – 10uF, measured – 19uF, deviation: +90%
C504: rated capacitance – 10uF, measured – 18uF, deviation: +80%
C511: rated capacitance – 4.7uF, measured – 6.1uF, deviation: +30%
C512: rated capacitance – 4.7uF, measured – 6.0uF, deviation: +28%
C513: rated capacitance – 1uF, measured – 1.6uF, deviation: +60%
C514: rated capacitance – 1uF, measured – 1.6uF, deviation: +60%
C517: rated capacitance – 1uF, measured – 1.6uF, deviation: +60%
C518: rated capacitance – 1uF, measured – 1.6uF, deviation: +60%
C525: rated capacitance – 220uF, measured – 282uF, deviation: +28%

Control amplifier board - before and after

Fisher 202_Control Amplifier_Before servicing

Fisher 202_Control Amplifier_After servicing

Dial and Stereo Indicator Lamps

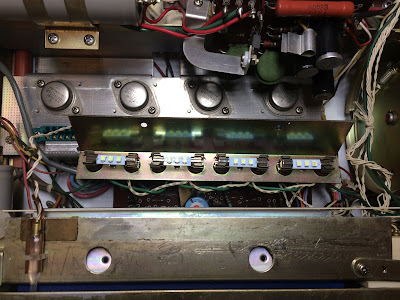
It is very easy to replace the old dial bulbs in Fisher 202. Just unscrew two small screws on the top of the dial plate and the plate holding all dial lamps would be released. I replaced the original incandescent bulbs with warm white LED lamps to maintain the original look and decrease heat.

Two stereo indicator bulbs burned out. I replaced them with new white LED lamps.

Old incandescent dial bulbs

Fisher 202_Dial lamps_Original incandescent

New warm white LED lamps installed

Fisher 202_Dial lamps_Warm white LEDs

Old stereo indicator bulbs

Fisher 202_Stereo indicator lamps_Original incandescent

New white LED lamps installed

Fisher 202_Stereo indicator lamps_White LED lamps

Center Voltage Adjustment

The center voltage adjustment is a straightforward procedure. The multimeter should be connected between pin 5 of the left/right channel driver board and the ground. With no signal input, the DC voltage at pin 5 should be adjusted to 31V. In general, the DC voltage at pin 5 should always be half of the voltage at pin 3. So, I adjusted the center voltage at pin 5 to ~31.5V on each channel since the voltage measured at pin 3 was 63V.

Center voltage adjustment - left channel

Fisher 202_Center voltage adjustment - left channel

Center voltage adjustment - right channel

Fisher 202_Center voltage adjustment - right channel

As a routine procedure on all vintage gears I restore, all the knobs and the faceplate were gently cleaned in warm water with dish soap. Also, all pots and switches have been cleaned with DeoxIT 5% contact cleaner and lubricated with DeoxIT FaderLube 5% spray.

The final result can be seen in the photos below. Thank you for reading.

Fisher 202 - before restoration

Fisher 202_Before restoration

Fisher 202_Before restoration_Inside

Fisher 202 - after restoration

Fisher 202_After restoration

Fisher 202_After restoration_replaced components

Fisher 202_After restoration_01

Fisher 202_After restoration_02

Fisher 202_After restoration_03

Sunday, November 8, 2020

Marantz 2230 Receiver Restoration

Unit: AM/FM Stereo Receiver
Manufacturer: Marantz
Model: 2230
SN: 41141

I bought this receiver about a year ago from the original owner. It has been sitting in his basement for some time and was rather dirty inside. However, it is still in perfect cosmetic condition without any scratches or dents. Marantz 2230 is one of my favorite entry-level receivers. It was introduced in 1972 and delivers 30 watts per channel into 8 ohms with total harmonic distortion under 0.5%. The optional walnut veneer cabinet for this model is WC-22. The list price in 1972 was $349.95.


According to the owner, this receiver was serviced only once about 20 years ago. He said that only the push button switch and dial bulbs were replaced. So, I decided to fully restore this receiver and service all boards including the tuner section. Below are some photos I took during my restoration process, complete with comments and recommendations.

Regulated Power Supply Board P800

The power supply board provides +14V DC to the Tuner and +35.6V DC to the phono and pre-amplifiers. The large wire wound resistor (150 Ohm, 5W) on this board runs very hot under normal operating conditions. Also, it sits very close to other electronic components and often touches the wires soldered to transistor H801. I replaced the original resistor with a new IRC / TT Electronics wire wound resistor. The new resistor is smaller, does not have bulky corners, and has a rated power of 7W instead of 5W. It reduces heat stress and discoloration of PCB.

The H801 transistor was removed from the heat sink, degreased, and tested on an Atlas DCA55 semiconductor analyzer. The DC current gain was in spec according to the datasheet. I replaced the old thermal pad with a new Sil-pad and mounted the H801 back on the heat sink. Two original diodes H804 & H805 were replaced with the modern fast recovery rectifiers UF4005. All electrolytic capacitors were replaced with low impedance and high-reliability Nichicon UPW/UPM caps. Finally, the voltage between the pin J808 and the ground was checked and adjusted to +35.6V.

I tested all original e-caps removed from the power supply board and only one capacitor C807 was outside of the factory capacitance tolerance +/- 20%. Not too bad for 46 years old gear!

Test results on original capacitors removed from the power supply board:

C803: rated capacitance – 470uF, measured – 445uF, deviation: -5%
C804: rated capacitance – 330uF, measured – 384uF, deviation: +16%
C805: rated capacitance – 470uF, measured – 542uF, deviation: +15%
C806: rated capacitance – 330uF, measured – 386uF, deviation: +17%
C807: rated capacitance – 3.3uF, measured – 4.9uF, deviation: +49%

Regulated Power Supply board P800 - before and after


Phono Amplifier Board P700

The phono stage in the 2230 model is known by many audiophiles as one of the best in class. Signals from the phono jacks are applied to phono amplifier board P700 consisting of transistors H701, H703, and H705, and temperature compensating diodes H707 and H709. The NPN transistor 2SC458LG installed on this board has a bad reputation as a potential source of the noise. I replaced two 2SC458LG transistors (H705 and H706) with modern low-noise Fairchild KSC1845. The new transistors were gain matched within 1%. The temperature compensating diode H709 was replaced with two 1N4448 diodes soldered in series. The other two diodes H707 and H708 were replaced with single 1N4448 diodes. The original tantalum capacitors C703 and C704 were replaced with low leakage Nichicon UKL caps. The e-cap C713 was replaced with a low impedance and high-reliability Nichicon UPM capacitor. The axial e-cap C011 soldered between the pin J706 and ground was replaced with a new Vishay axial capacitor.

All original e-caps removed from the phono amplifier board were within the factory capacitance tolerance +/- 20%.

Test results on original capacitors removed from the phono amplifier board:

C703: rated capacitance – 22uF, measured – 25uF, deviation: +14%
C704: rated capacitance – 22uF, measured – 25uF, deviation: +14%
C713: rated capacitance – 100uF, measured – 119uF, deviation: +19%
C011: rated capacitance – 220uF, measured – 258uF, deviation: +17%

Phono Amplifier board P700 - before and after


Tone Amplifier Board P400

Pre-amplifier board P400 consists of two stages of direct-coupled amplifiers (H401 and H403, H405 and H407). The tone control unit is sandwiched between these two direct-coupled amplifiers. This board has 8 low leakage electrolytic capacitors: C403/C404, C407/C408, C410/C411, and C414/C415. I replaced all those e-caps with high-quality film polyester WIMA MKS2/MKS4 caps. The remaining 3 e-caps (C405, C406, and C409) were replaced with low impedance and high-reliability Nichicon UPW capacitors. No transistors were replaced on this board. The test results on all e-caps removed from the board are below. 5 original e-caps are outside of the factory capacitance tolerance. It clearly shows the importance of replacing all electrolytic capacitors in any vintage gear!

Test results on original capacitors removed from the tone amplifier board:

C403: rated capacitance – 1uF, measured – 1.06uF, deviation: +6%
C404: rated capacitance – 1uF, measured – 1.06uF, deviation: +6%
C405: rated capacitance – 10uF, measured – 15uF, deviation: +50%
C406: rated capacitance – 10uF, measured – 14uF, deviation: +40%
C407: rated capacitance – 3.3uF, measured – 4.6uF, deviation: +39%
C408: rated capacitance – 3.3uF, measured – 4.4uF, deviation: +33%
C409: rated capacitance – 100uF, measured – 98uF, deviation: -2%
C410: rated capacitance – 3.3uF, measured – 3.7uF, deviation: +12%
C411: rated capacitance – 3.3uF, measured – 4.3uF, deviation: +30%
C414: rated capacitance – 1uF, measured – 1.15uF, deviation: +15%
C415: rated capacitance – 1uF, measured – 1.18uF, deviation: +18%

Tone Amplifier board P400 - before and after


Power Amplifier Board P750

I recommend paying attention to all electrolytic capacitors on this board if you need to service it. I found at least three errors in the schematic concerning the e-caps C751, C753, and C757. The schematic shows the e-cap C751 as 0.47uF/25V despite the original capacitor installed on the board being 1uF/50V. This is a signal path capacitor. I replaced this cap with a high-quality film polyester WIMA MKS2 cap with the same rated capacitance and voltage as the original, i.e. 1uF/50V. The next capacitor in question is C753. The schematic shows this position as 1uF/50V despite the original capacitor being 10uF/35V. I replaced this cap with a Nichicon UPW e-cap with the same rated capacitance as the original but with an increased voltage to 50V. The last capacitor in question is C757. The schematic shows this position as 22uF/35V despite the original capacitor being 22uF/50V. So, the installed e-cap has the same capacitance as the schematic shows but with a higher rated voltage.  I replaced this cap with a Nichicon UPW e-cap keeping the same rated capacitance and voltage as the original. The remaining e-caps C752, C754, and C755 were replaced with Nichicon UPW/UPM caps. The test results on all e-caps removed from the board are below. Only 2 original capacitors out of 12 are still in factory capacitance tolerance.

Test results on original capacitors removed from the power amplifier board:

C751-L: rated capacitance – 1uF, measured – 0.96uF, deviation: -4%
C751-R: rated capacitance – 1uF, measured – 0.96uF, deviation: -4%
C752-L: rated capacitance – 100uF, measured – 127uF, deviation: +27%
C752-R: rated capacitance – 100uF, measured – 132uF, deviation: +32%
C753-L: rated capacitance – 10uF, measured – 15uF, deviation: +50%
C753-R: rated capacitance – 10uF, measured – 15uF, deviation: +50%
C754-L: rated capacitance – 47uF, measured – 60uF, deviation: +28%
C754-R: rated capacitance – 47uF, measured – 61uF, deviation: +30%
C755-L: rated capacitance – 47uF, measured – 59uF, deviation: +26%
C755-R: rated capacitance – 47uF, measured – 62uF, deviation: +32%
C757-L: rated capacitance – 22uF, measured – 29uF, deviation: +32%
C757-R: rated capacitance – 22uF, measured – 28uF, deviation: +27%

The trimming resistors used to adjust the bias (R765) and clipping level (R760) were replaced with new Bourns potentiometers.  The emitter resistors R774 and R775 were replaced with modern Vishay wire wound resistors with increased rated power.

Power Amplifier board P750 - before and after


Power Transistors

All four power transistors H001 thru H004 were removed, cleaned, and tested with Atlas DCA55 semiconductor analyzer. The DC current gain was in spec according to the datasheet. However, it should be noted that Atlas DCA55 semiconductor analyzer only provides an accurate reading for DC current gain on low-power transistors. A high-power transistor requires a much higher collector current and collector-emitter voltage to accurately measure its current gain. However, it is still a very useful device for comparing transistors of a similar type for the purposes of gain matching or fault-finding.

I applied a fresh thermal compound and replaced the old thermal pads with new Mica ones which is always a good idea when working on any vintage receiver. A new thermal compound was also applied to the thermal tracking diodes H005 and H006.

Power transistors tested with Atlas DCA55 semiconductor analyzer


AM Tuner Board P150

The AM tuner board has 12 electrolytic capacitors: C161, C162, C164, C166, C171, C173, C175, C178, C180, C181, C183, and C184. All of them except e-cap C184 have the same capacitance and voltage. I replaced all of them with low impedance and high-reliability Nichicon UPW capacitors. The e-cap C184 installed on this board is 100uF/10V and was also replaced with a Nichicon UPW cap. Watch out for e-cap C183. The silkscreen is backward. The + side of the C183 cap goes to the chassis ground.

AM Tuner board P150 - before and after


MPX Stereo Decoding Amplifier Board P300

This is the most difficult board in Marantz 2230 to work on. It is mounted on a chassis under the AM tuner board. Due to the engineering design, there is very limited space to work on here. The electrolytic capacitor C324 was replaced with a high-quality film polyester Nichicon cap. Four low leakage e-caps C331 thru C334 were replaced with low leakage Nichicon UKL caps. The remaining e-caps were replaced with Nichicon UPW caps.

MPX Stereo Decoding Amplifier board P300 - before and after


FM Detector Board P500

The FM detector board has 6 electrolytic capacitors: C503, C508 thru C511, and C514. I replaced two e-caps C509 and C510 with low leakage Nichicon UKL caps. The remaining four e-caps were replaced with Nichicon UPW caps.

FM Detector board P500 - before and after


Muting Control Amplifier Board P550

This board has only two electrolytic capacitors: C554 and C559. The C554 cap was replaced with the Nichicon UPW cap while the C559 with low leakage Nichicon UKL cap.

Muting Control Amplifier board P550 - before and after


Filter and Coupling capacitors

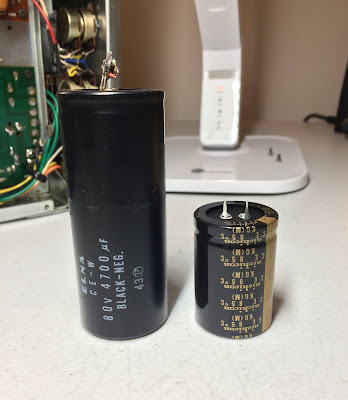
The original filter capacitor C007 is rated at 4700uF/80V. Two coupling capacitors C008 and C009 are rated at 2200uF/63V. I replaced the filter cap with a 4700uF/80V Nichicon LKG cap specially designed for high-grade audio equipment. The modern capacitors are usually much smaller, and a new clamp is needed to securely hold them. I replaced the old clamp with a new Kemet PYC6041 clamp, which did the job. The coupling capacitors were replaced with 2200uF/80V Nichicon LKG series. No new clamps are needed for coupling caps since both old and new caps have the same diameter.

Old and New Filter Capacitors - note that both caps have the same rated capacitance and voltage


New filter and coupling capacitors installed


Dial lamps and Vellum paper

I replaced old incandescent dial bulbs with warm white LED lamps to maintain the original look and decrease heat. The old yellowish vellum behind the dial scale was replaced with new heavyweight clear vellum paper. In addition, I replaced the original bulb behind the FM/AM signal meter with a warm white LED lamp. The old vellum behind the FM/AM signal meter was replaced as well.

Dial scale removed

Old incandescent dial bulbs - one original bulb was missing


New warm white LED lamps installed


Signal meter with new vellum installed


Controls Cleaning and Lubricating

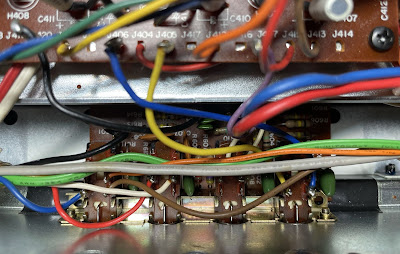
Both BALANCE and VOLUME pots in Marantz 2230 have great access for cleaning from the back side of the unit. The SELECTOR switch can also be very easily cleaned when the bottom plate is removed. However, the access to the BASS, MID, and TREBLE pots, as well as four switches (Low/High Filter, Loudness, Muting) is limited even from the back side. To properly clean all these pots and switches one should take apart the tone control unit assembly P450. To do this the faceplate should be removed from the chassis and three nuts holding the BASS, MID, and TREBLE pots unscrewed. It is pretty easy to do and the unit assembly P450 can be easily released for cleaning.

All controls have been cleaned with DeoxIT 5% contact cleaner and lubricated with DeoxIT FaderLube 5% spray.
Tone control unit assembly P450 - released from the chassis for cleaning

Marantz 2230_P450_Released for cleaning

Switch unit assembly P600 (Low/High Filter, Loudness, Muting)

Marantz 2230_P600_Switch Unit Assembly

Audio Adjustments

All audio adjustments are clearly described in a service manual.

I adjusted the idle current to ~5mV on each channel according to the service manual (connect a multimeter across the resistor R774, between pins J757 and J758).

To adjust a clipping level I connected my oscilloscope across the speaker terminals and applied a sine-wave signal of 1 kHz to the AUX jacks. A low inductance 8Ω/100W dummy resistor was used as an output load. The trimming resistor R760 was adjusted for equal clipping.

I connected the oscilloscope to the TAPE OUT jacks to adjust the clipping level on the phono amplifier. The function generator was connected to the PHONO jacks and a sine-wave signal of 1 kHz was applied. The trimming resistor R708 was adjusted for equal clipping. For the other channel, the trimming resistor R709 was adjusted.

As usual, all the knobs and the faceplate were gently cleaned in warm water with dish soap.

The final result can be seen in the photos below. Please watch a short demo video at the end of this post. Thank you for reading.

Marantz 2230 - before restoration


Marantz 2230 - after restoration


Demo video after repair & restoration